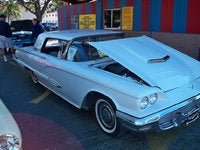
hidden headlight covers slowly open...where is the problem ?
4 Answers
Don't know if your system is like my 81 T-Bird. Vacuum holds the doors closed. Default position is with "No Vacuum", the doors will remain open. There were plastic, "Open/close" check valves in each feed line to the actuators to permit maintenance on the sealed beams. I removed them and direct piped the vacuum hoses to the actuators. Also the vacuum plastic "Body" on the rear of my light switch started leaking, not holding vacuum, so my doors would not stay closed. Sounds as if the vacuum is being released slowly. Once open, do they close quickly?
MrBlueOval answered 11 years ago
I'm the top expert here after working on the assembly line building the '77-'79 T-Birds. I worked from the front of the line to the end and everywhere inbetween during that time. I've also owned many of the '77-79 birds over the years. Everyone else so far is correct here. The headlight doors are actually fiberglass not plastic on the '77-79 Birds. All were vacuum operated using a vacuum operated diaphram behind the grille and front bumper to open and close the doors. Vacuum would close the doors ,no vacuum would open the doors so if you lost vacuum you could still drive the car at night There were also check valves in the lines to keep the doors open with no vacuum and for access to servicing or replacing headlight bulbs. Now, you are looking at a 37 year old car with 37 year old rubber vacuum lines that have been subjected to tons of underhood engine temps of over 500 degrees for many years and also possibly (depending on where you live) sub-freezing temps too. This can do havoc to ANY rubber product. Your headlight switch consists of being electrical and vacuum operated so electrical contacts could be corroded but probably either the plastic ports on the switch itself are dryrotted & cracked and leaking vacuum or your 25 feet of rubber vacuum hose running from the switch to the diaphram is dryrotted and/or cracked somewhere and losing vacuum along the way. Even a pinhole will slow things down. First thing to do is to lubricate all the contact points that move with the doors with some PB Blaster(better than WD-40) Next would be to replace all 3 of the hoses and check valves from the switch to the vacuum canister behind the front grille ($40-$60), if that doesn't solve the problem, then check the vacuum tank for rust holes (it's metal and could have pinholes in it) Replace or repair holes with 2-part epoxy. Next would be to change out the switch ($80-$120). last thing would be to replace or repair (could also be rusty with pinholes) the vacuum canistor behind the grille. Nothing left to fix after that. The problem of the eyelids opening up too soon is a common problem with our Birds. The eyelids should stay closed for a week or so. If not, there are some fixes that most guys can deal with effectively--if you're patient. In order of priority here are the sources of the problem: 1) Leaky headlight switch (located under the dash). Even new NOS switches leak due to sitting on the shelf for 30 years. Place your head under the dash (motor off) and listen for a subtle hiss. The hiss may be imperceptible. Make sure the three vacuum hoses are fitted securely to the switch itself. The 1977-78 switch is slightly different from the 1979 switch. The earlier switch is different if you have the visability group on your car or not so make sure you get the correct switch for a '77. With the visability group you will have an extra plug connecting to the switch. 2) Leaky check valve: small aluminum valve (three hose connections) located on the driver-side fender apron. 3) Poor connection of vacuum line to the vacuum port on the back-side of the intake manifold. Remove your air cleaner. Use a strong light to inspect the connection. Cut off a bit of the hose and re-plug it back into the port. 4) Vaccum air tank: the tank where the vacuum is stored (to keep the headlight covers closed) is located under the front-portion of the driver-side fender (out of sight). You access it by removing the radiator overflow tank and the two horns. Notice the vacuum line plugged into the side of the tank. Check for a leaky connection there. Cut off some of the line and re-plug it in. The tank may have developed a leak as well. 5) Removing the tank: Remove the three bolts that hold it in place. Two underneath, and one on the fender jam. It will take some jostling to remove the tank. Take the tank to a radiator shop and ask them to check for air leaks. They should be able to re-seal the tank with solder or you can do it with epoxy too, either way works just as good as the other. 6. Check for cracked hoses. The vacuum lines may have developed cracks. Inspect all hoses under bright lights. Replace as needed. Hope all this helps. Good Luck. Kenny/MrBlueOval
how likely is it that the diaphram needs replaced?
78towncoupe answered 6 years ago
78 town coupe. I only have 2 hoses hooked to switch. Cant locate the green anywhere. Help please.

