where do you check transmission fluid in a 2000 chevy cavalier
Asked by yvonne_1975 Mar 07, 2010 at 10:34 AM about the 2000 Chevrolet Cavalier LS Sedan FWD
Question type: Maintenance & Repair
7 Answers
if it has the 4 speed tranny, you cant its a non serviceable tranny
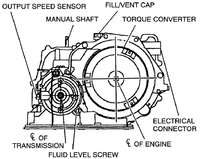
wrong thats what they want you to think so u take it in and they make money. this is straight outta the chiltons book even with a pic Remove the oil check plug. The oil level should be at the bottom of the oil check hole. Because the transaxle operates correctly over a range of fluid levels, fluid may or may not drain out of the screw hole when the screw is removed. If fluid drains through the screw hole, the transaxle may have been overfilled. When fluid stops draining, then fluid level is correct and the check plug may be installed. If fluid does not drain through the screw hole, the transaxle fluid may have been low. Add fluid at the vent cap location in 1 pint increments until the oil level is at the bottom of the oil check hole. Install the oil check plug/fluid level screw and tighten to 10 ft. lbs. (14 Nm).
open your hood and the fill vent cap should be on the drivers side towards the front on the top of the trans if u need a pic of this just ask and ill get one offa my fiances sunfire----- it should have a red color to it. lemme kno how it goes
Can you please send me a picture. My son just bought the car. I was looking to see if there was a way to check the fluid level. On the top about the middle I found that there is a hole with nothing in it. It is almost the size of a quarter and can see something that almost looks like a cable inside. Don't know what it is in the hole but I wondering if that is the hole you are talking about and they left the plug out and never re-installed it. Thank you
if it is a manual you have to put the plug on the side of the tranny and fill tell it comes out the hole sorry i dont have any pics
Search... The Ultimate Gearhead Encyclopedia ® MENU DRAIN AND FILL - ATF 2000 CHEVY CAVALIER 2.2L 4SPD BY NATIVESON Report This By diyauto ( 1 ) Drain and Fill - ATF 2000 Chevy Cavalier 2.2L 4spd Compliments of NativeSon Drain and Fill - ATF Description: Drain and Fill process allows you to remove some of the ATF from your transmission. (More of the used ATF can be removed if process is repeated.) This particular transmission has no dipstick to measure the proper level of ATF. However, there is a Hex screw bolt (Check Level Bolt) that can be used to check/drain for the proper level. Once ATF pan is lowered, drained, and removed, you can easily remove and replace the filter as well. Note: The cars handbook states that the dealership should replace the ATF if it is needed. A flushing process is used by the professionals to get all the used ATF out at one time. Estimate time to complete job: Around 3 hours. Do not rush, this is plenty of time and safety is key! Skill level: If youve done some work on your car before then you should be fine with this job. However, this is not a job for the beginner. (ATF can be hot!) Make: Chevy Model: Cavalier Year: 2000 Engine: 2.2L Transmission: Automatic, 4 Speed Tools Needed: 1) Ramp (recommended over jack stands,better for safety reasons.) 2) Jack (optional) 3) Tire Chocks ( or something else to block rear tires) 4) Newspapers and paper towels or old rags (..you will have spills) 5) Rubber gloves and protective goggles 6) Bucket of soapy water (quick clean of gloves and tools) 7) Bucket (3 Gallon/ 12Liter for ATF; not all of ATF will be drained maybe half?) 8) Ratchet (8mm socket for pan bolts; 10mm for Check Level Bolt) 9) Plastic long-neck funnel 10) Additional cleaners or scraper to remove old gasket material if needed. Parts Needed: 1) Gasket ( NAPA OEM part # 1-7892 @ $25.00; best choice because of the metal base and rubber combination) 2) ATF filter and ring gasket Note: NAPA and AutoZone both sell a kit which includes both gasket and filter however, the AutoZones gasket was too thin and flimsy while the NAPA kit did not include the best choice gasket but a cork and rubber combination..?? So I bought both NAPA OEM gasket and AutoZone kit and just used the filter. 3) ATF or Synthetic ATF (see owners manual for specific type) Note: Amount needed depends on how much of the ATF has drained from your vehicle. My car drained just 4 quarts. Total ATF in transmission is 9.3 quarts. How-To Steps (pretty straight-forward process; refer to pics when available): (Before you begin, you might want to take your car to a car wash and do an engine cleaning and underneath. This will help remove the dirt from the work area of ATF pan.) 1) Warm car up to operating temperature. (But not too hot.) 2) Drive onto ramp, stop, secure Hand Brake, place in PARK and turn off motor; place chocks behind rear tires. 3) Open up hood of car and remove ATF cap (see pic). Note: There is no dipstick attached to cap. 4) Place a few layers of newspapers under ATF pan and clean pan gasket area. If a lot of dirt debris falls, then roll up one layer of paper and discard. Keeping work area clean as possible is important. Also, wash off or replace rubber gloves. 5) Place bucket under pan and remove initial screw bolts (see pic) and begin draining fluid. Eventually, all bolts will be loosened and removed. Note: There is no drain plug on the ATF pan. 6) Remove ATF pan. Some fluid will still be left in pan so be careful.(see pic) 7) Remove filter and small metal/rubber gasket ring (see pic). Some fluid will still be left in filter so be careful. Note: There are no clips holding the filter in place. Just pull the filter straight down from where the neck is inserted into the transmission. The small gasket ring holds the filter in place. Also, I could not get the old small gasket ring out so I just left it in place. The new filter fit just fine snug and tight. 8) Clean all surfaces of any old gasket (..and possible sealer material). Note: Use plastic scraper or plastic knife to scrape. Do not mar any surfaces of pan or transmission. Clean all pan bolts as well. 9) Install new gasket ring (if you removed old one) and install new filter. 10) Place new NAPA gasket on pan using the alignment holes and plugs on gasket to keep gasket in place while attaching both pan and gasket to transmission.(see pic) 11) Hand tighten all pan bolts in a cress-cross pattern at first. This will insure that the threads of the bolts were not damaged. Then tighten again using a 8mm socket ratchet. DO NOT OVER TIGHTEN! Just snug them tight. 12) Re-fill ATF using a long funnel into the hole where the ATF cap goes. Then replace ATF cap. Note: Only replace ATF amount with the same amount that was drained. Do not over-fill. 13) Start car and let warn to operating temperature then stop. Check for any leaks. Note: You might have to re-tighten the bolts if any sign of ATF has appeared. Just snug them tight again. The heat of the warm up may loosened or relaxed the rubber gasket a bit. 14) Done! (sort of recycle old ATF at local oil change shop) Now, lets say youre not sure if the level of ATF is correct in your transmission. You can take your car to a local oil change shop and have them check it out or you can check it yourself. This may be harder for you to do? How To Check Level of ATF: (see pic below) 1) Car warmed up to operating temperature and let idle in PARK, Hand Brake on. 2) Car must be level and not tilted. Note: This would be the hard part. The professionals have a pit to check level. You would have to find away to level your car? Another set of ramps..$$?? 3) Remove Check Level Hex Bolt (10mm). Careful, hot ATF! 4) If ATF amount is too high then it will pour out of the hole when bolt is removed. Let it drain until only a few drips or spits is coming out. Replace bolt. 5) If nothing is coming out of the hole (..not even a spit or two) then the fluid level may be too low. Slowly add fluid (use fill cap hole not Check Level hole) until it starts to exit Check Level hole. Let excess fluid drip then spit. Replace bolt. 6) ATF amount is correct. 7) Done! Good luck! Hope this helps someone. BTW- Big thanks to Dale, owner of ‘Shell Rapid Lube at 3601 Wyoming Blvd. NE Albuquerque, NM 87111. He and his crew help me by checking my ATF level and showing me where the Check Level Hex Bolt was located on my Chevy tranny. Free of Charge! Thanks again, Dale. Comments Copyright © 2019 DIY Auto, LLC. All Rights Reserved.
3) ATF or Synthetic ATF vehicle. My car drained just 4 quarts. Total ATF in transmission is 9.3 quarts.

